Recently I received an email from King Arthur Flour about a challenge they were promoting called Bake the Bag. The challenge lasts for 9 weeks and the object is to bake an entire bag of their White Whole Wheat Flour over a 9 week period. Of course I decided to accept the challenge!
Best Banana Nut Bread ever!
First up was a recipe for Banana Nut Bread which admittedly is not my favorite food item on the planet but since I needed some ripe bananas, I purchased those and moved to the 2nd week challenge of Chocolate Chip Cookies, a recipe more to my liking. It wasn’t a complicated recipe and the end result was not as good as anticipated. The cook time was off for me even though my oven temp is accurate according to an oven thermometer. So this recipe was a bust for me and all recipes that receive that rating travel promptly to the trash can. I’ll stick to the Toll House recipe on the package of Nestle’s chocolate chips in the future.
The bananas finally ripened enough and as I type this, I can smell the aroma wafting from my kitchen. This recipe had an option of adding chocolate chips or butterscotch chips to the batter. Well, I had peanut butter chips and decided that peanut butter and banana is a favorite food group so in they went.
Delicious, delicious, delicious!!! And this from a person who really doesn’t like banana nut bread.
Next up were Brownies and they certainly didn’t disappoint. From scratch, dark chocolate fudgy goodness that was definitely worthy of being a keeper recipe.
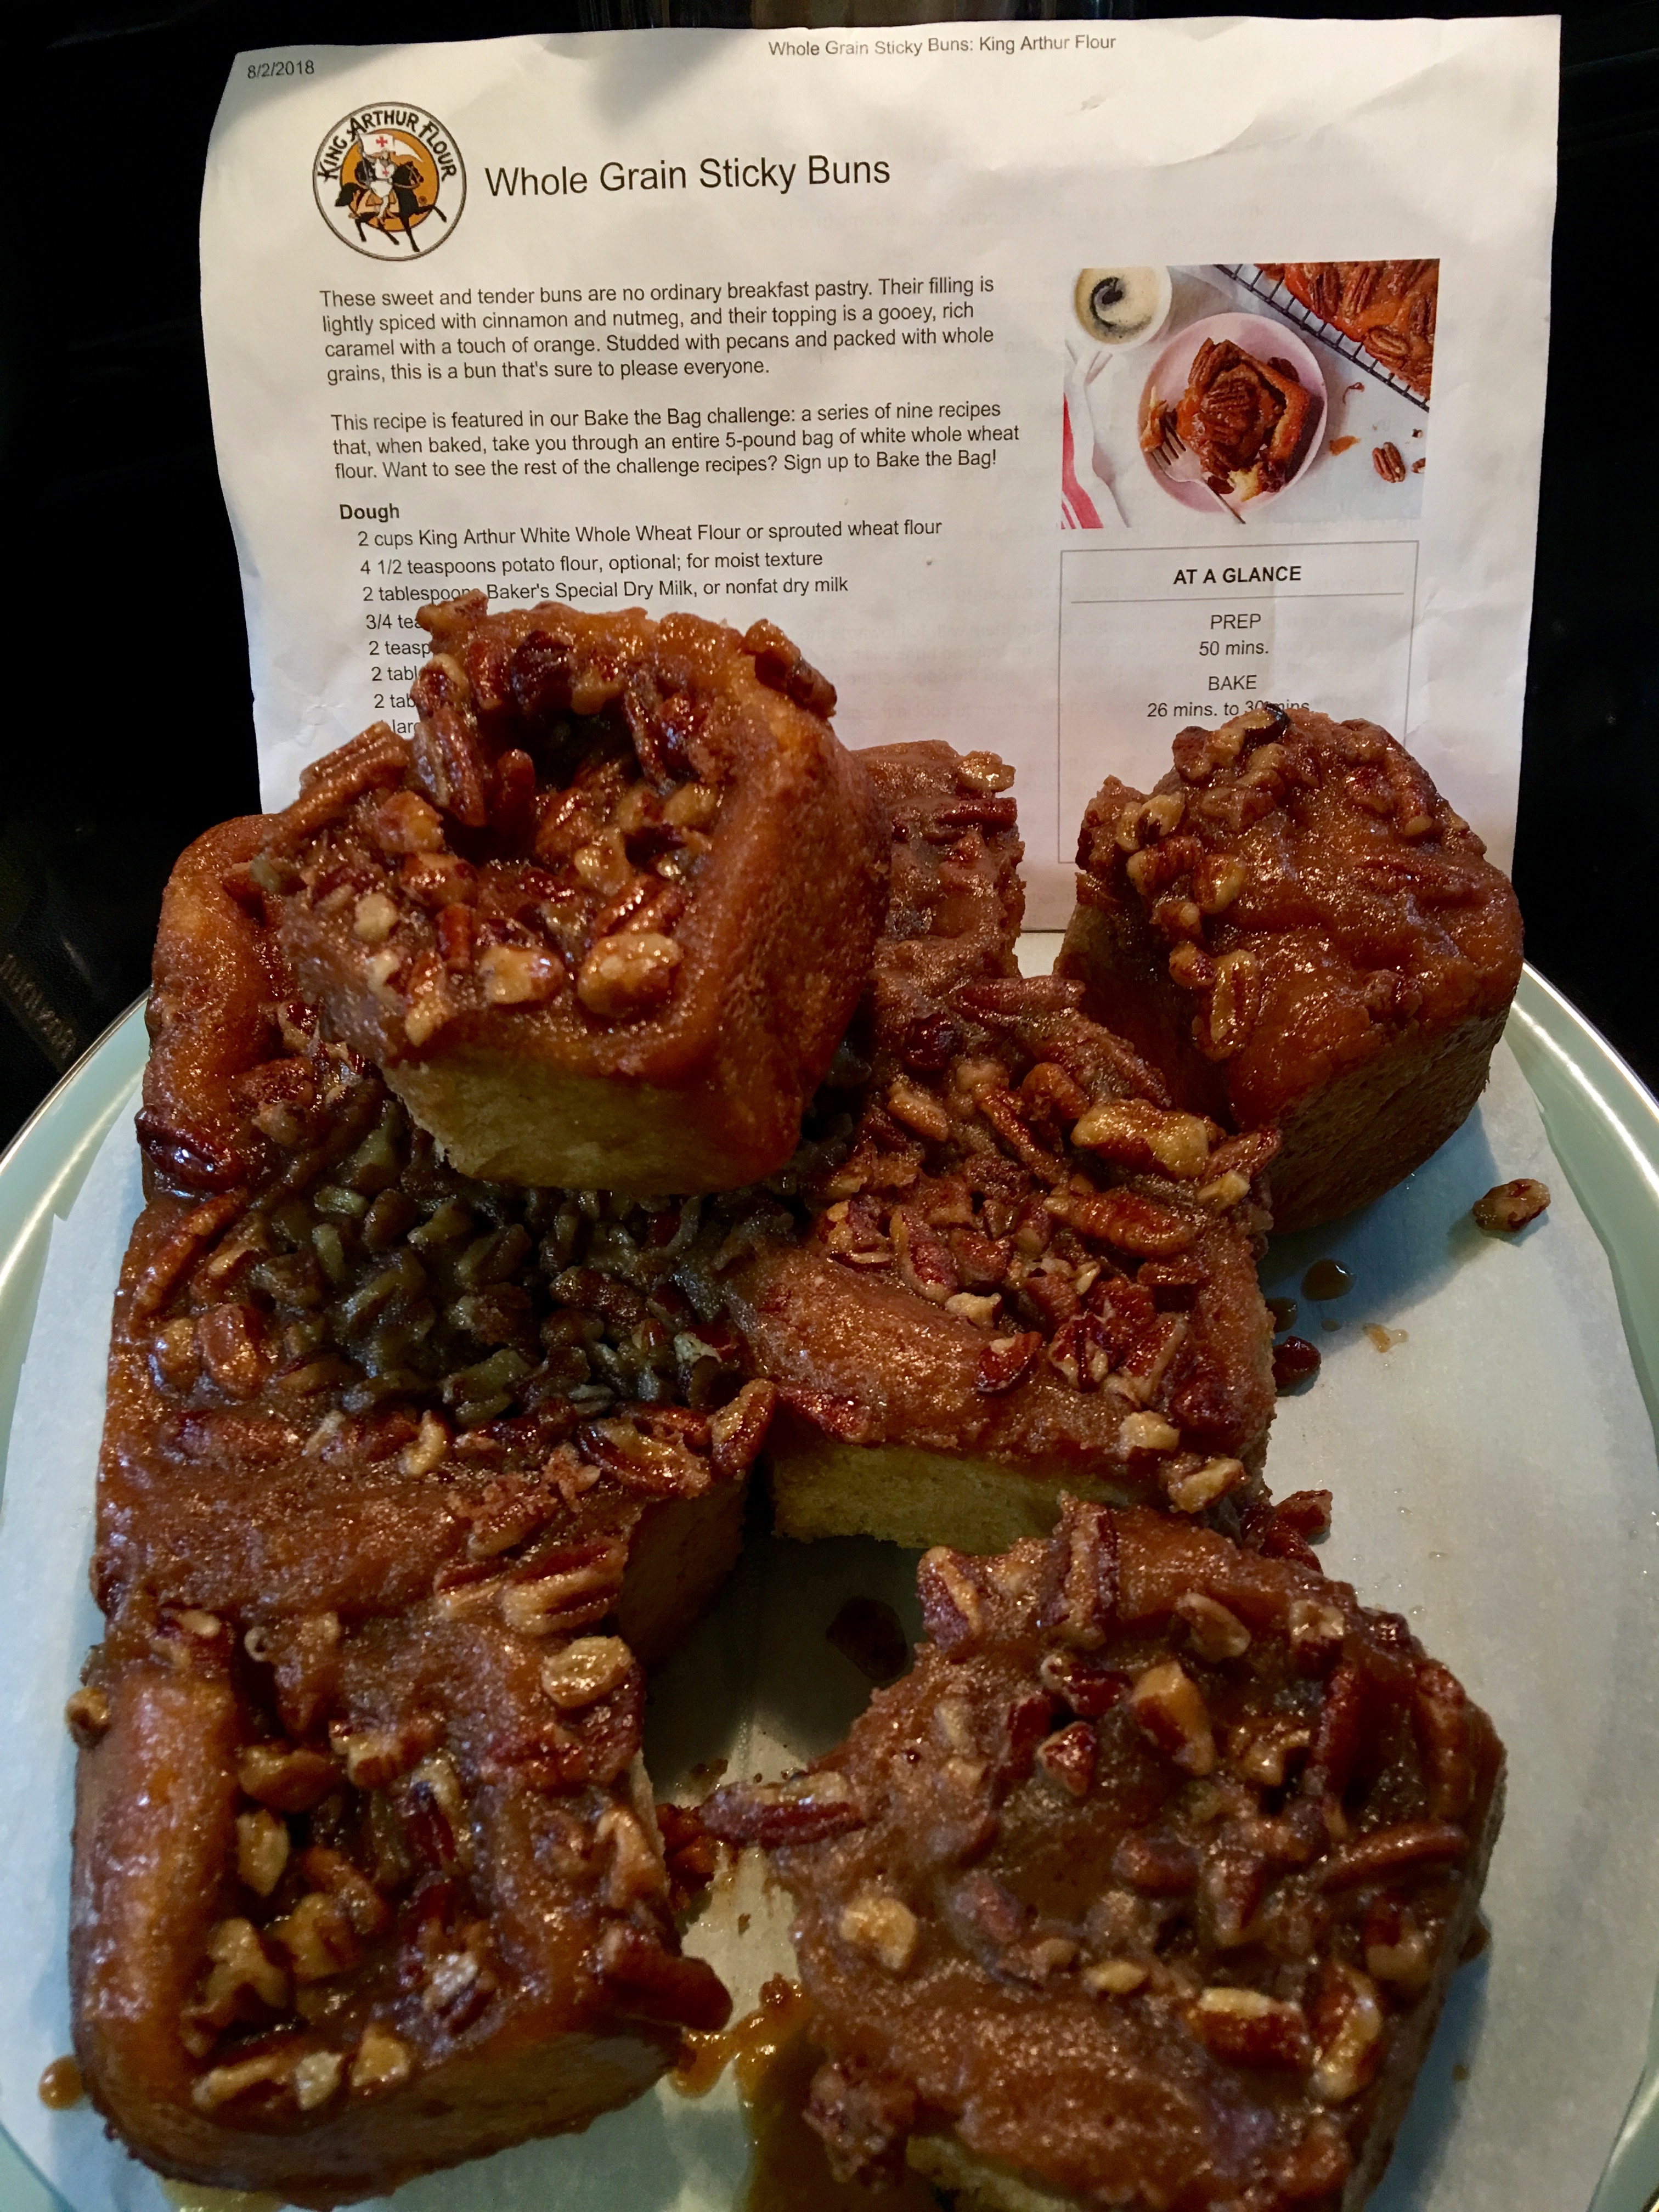
Last Monday I cranked out the weekly challenge of Sticky Buns! And they were extremely good. The only change I would make next time would be to use a brioche or sweet dough using bread flour rather than the white whole wheat flour.
I am enjoying the weekly challenges in “Bake the Bag”. Check it out on the King Arthur Flour web site https://www.kingarthurflour.com/bake-the-bag/ if you might be interested. Next up…Carrot Cake! My favorite!!!
Last night I made a poolish from my sour dough starter Boris! My last sour dough bread attempt resulted in baseball bat bread loaves so I was ready for a success story. And Boris delivered today! Just to be on the safe side…I padded my success by adding a teaspoon of yeast to my poolish when I added the rest of the ingredients. I left this huge dough ball in a large bowl, covered with a clear shower cap, to rise while I went to have lunch with my sister.
When I returned, the dough ball was straining the confines of the shower cap and had risen far above the rim of my large bowl. I punched it down and turned it onto my Boos block with a little bench flour and began kneading it. The dough was silky smooth and elastic and I could tell by the feel of the dough that this was going to be a successful baking adventure.
I wasn’t wrong…the crustiest crust that crackled when I cut a slice and the interior crumb was moist, chewy and had a decided sour bite. For my palette it was perfect!!! I couldn’t resist smearing some sweet cream butter onto a piece and tasting the rewards of my efforts. Two beautiful loaves of sour dough bread…check!!
I then mixed up the dough for my go-to-daily bread the Multigrain Dakota. This is truly a never fail recipe and I wanted to take a loaf to my sister in Burton tomorrow.
On my quick trip to the HEB today I spotted a muffin tin that had larger cups and decided I must have it. The one I have has the standard size cups but I wanted to be able to make a muffin that rivaled bakery muffins. So it now awaits another batch of bran muffins. But, there is always a wrinkle it seems. The HEB I was in didn’t have any wheat bran so I had to substitute oat bran. So, fingers crossed that they taste as good as the first batch but look a whole lot prettier.
One of the curses or perhaps benefits of experimental bread baking is the plethora of left over bread, the uneaten or slightly stale bread. No way can I possibly consume all of the bread that I am making right now. So the obvious ways to dispose of unwanted or surplus bread are to share with friends, which I am doing at my place of work, or transform it into an entirely new form. I always warn my coworkers that everything I am producing right now is trial and error and mistakes are sometimes made along the road of progress.
Breadcrumbs were made famous in a children’s fairy tale called Hansel and Gretel. These two children went walking in the forest and afraid they would get lost, they decided to drop bread crumbs as they went so they could later follow them back home. As an adult it is easy to foresee the folly of their plan but it made for a good story in a child’s mind.
A popular scene in many movies is someone feeding the pigeons from a park bench. Seeds, bread crumbs being fed to a flock of birds is a peaceful bucolic scene. There is a man who lives in my condo building who daily makes his way to feed the numerous pigeons that call our little piece of property their home. They flock around him eagerly awaiting the tiny morsels he brings them each day.
Bruschetta is another way to use stale bread. Slices of toasted bread topped with a multitude of savory spreads make for a delightful, satisfying appetizer accompanied by a nice bottle of wine. And a cousin of bruschetta would be crostini, a smaller size bread base with a variety of toppings. Both make excellent antipasta.
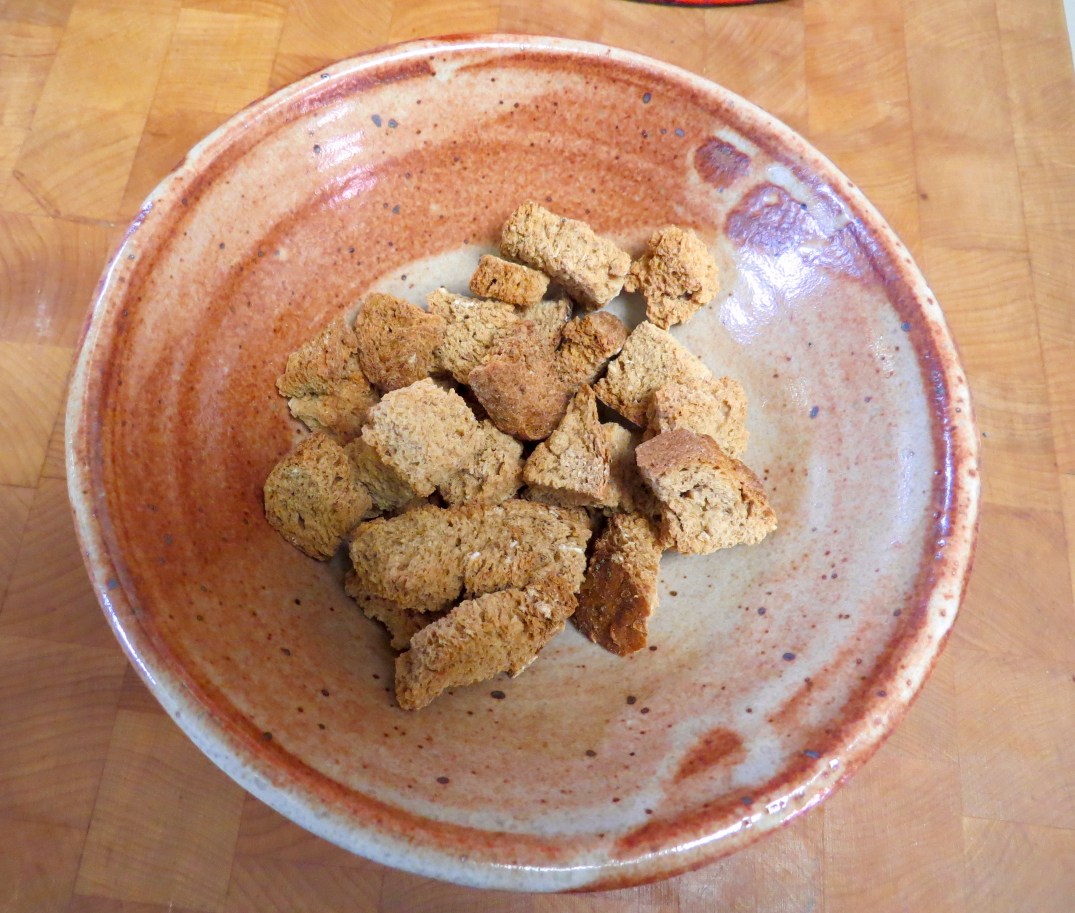
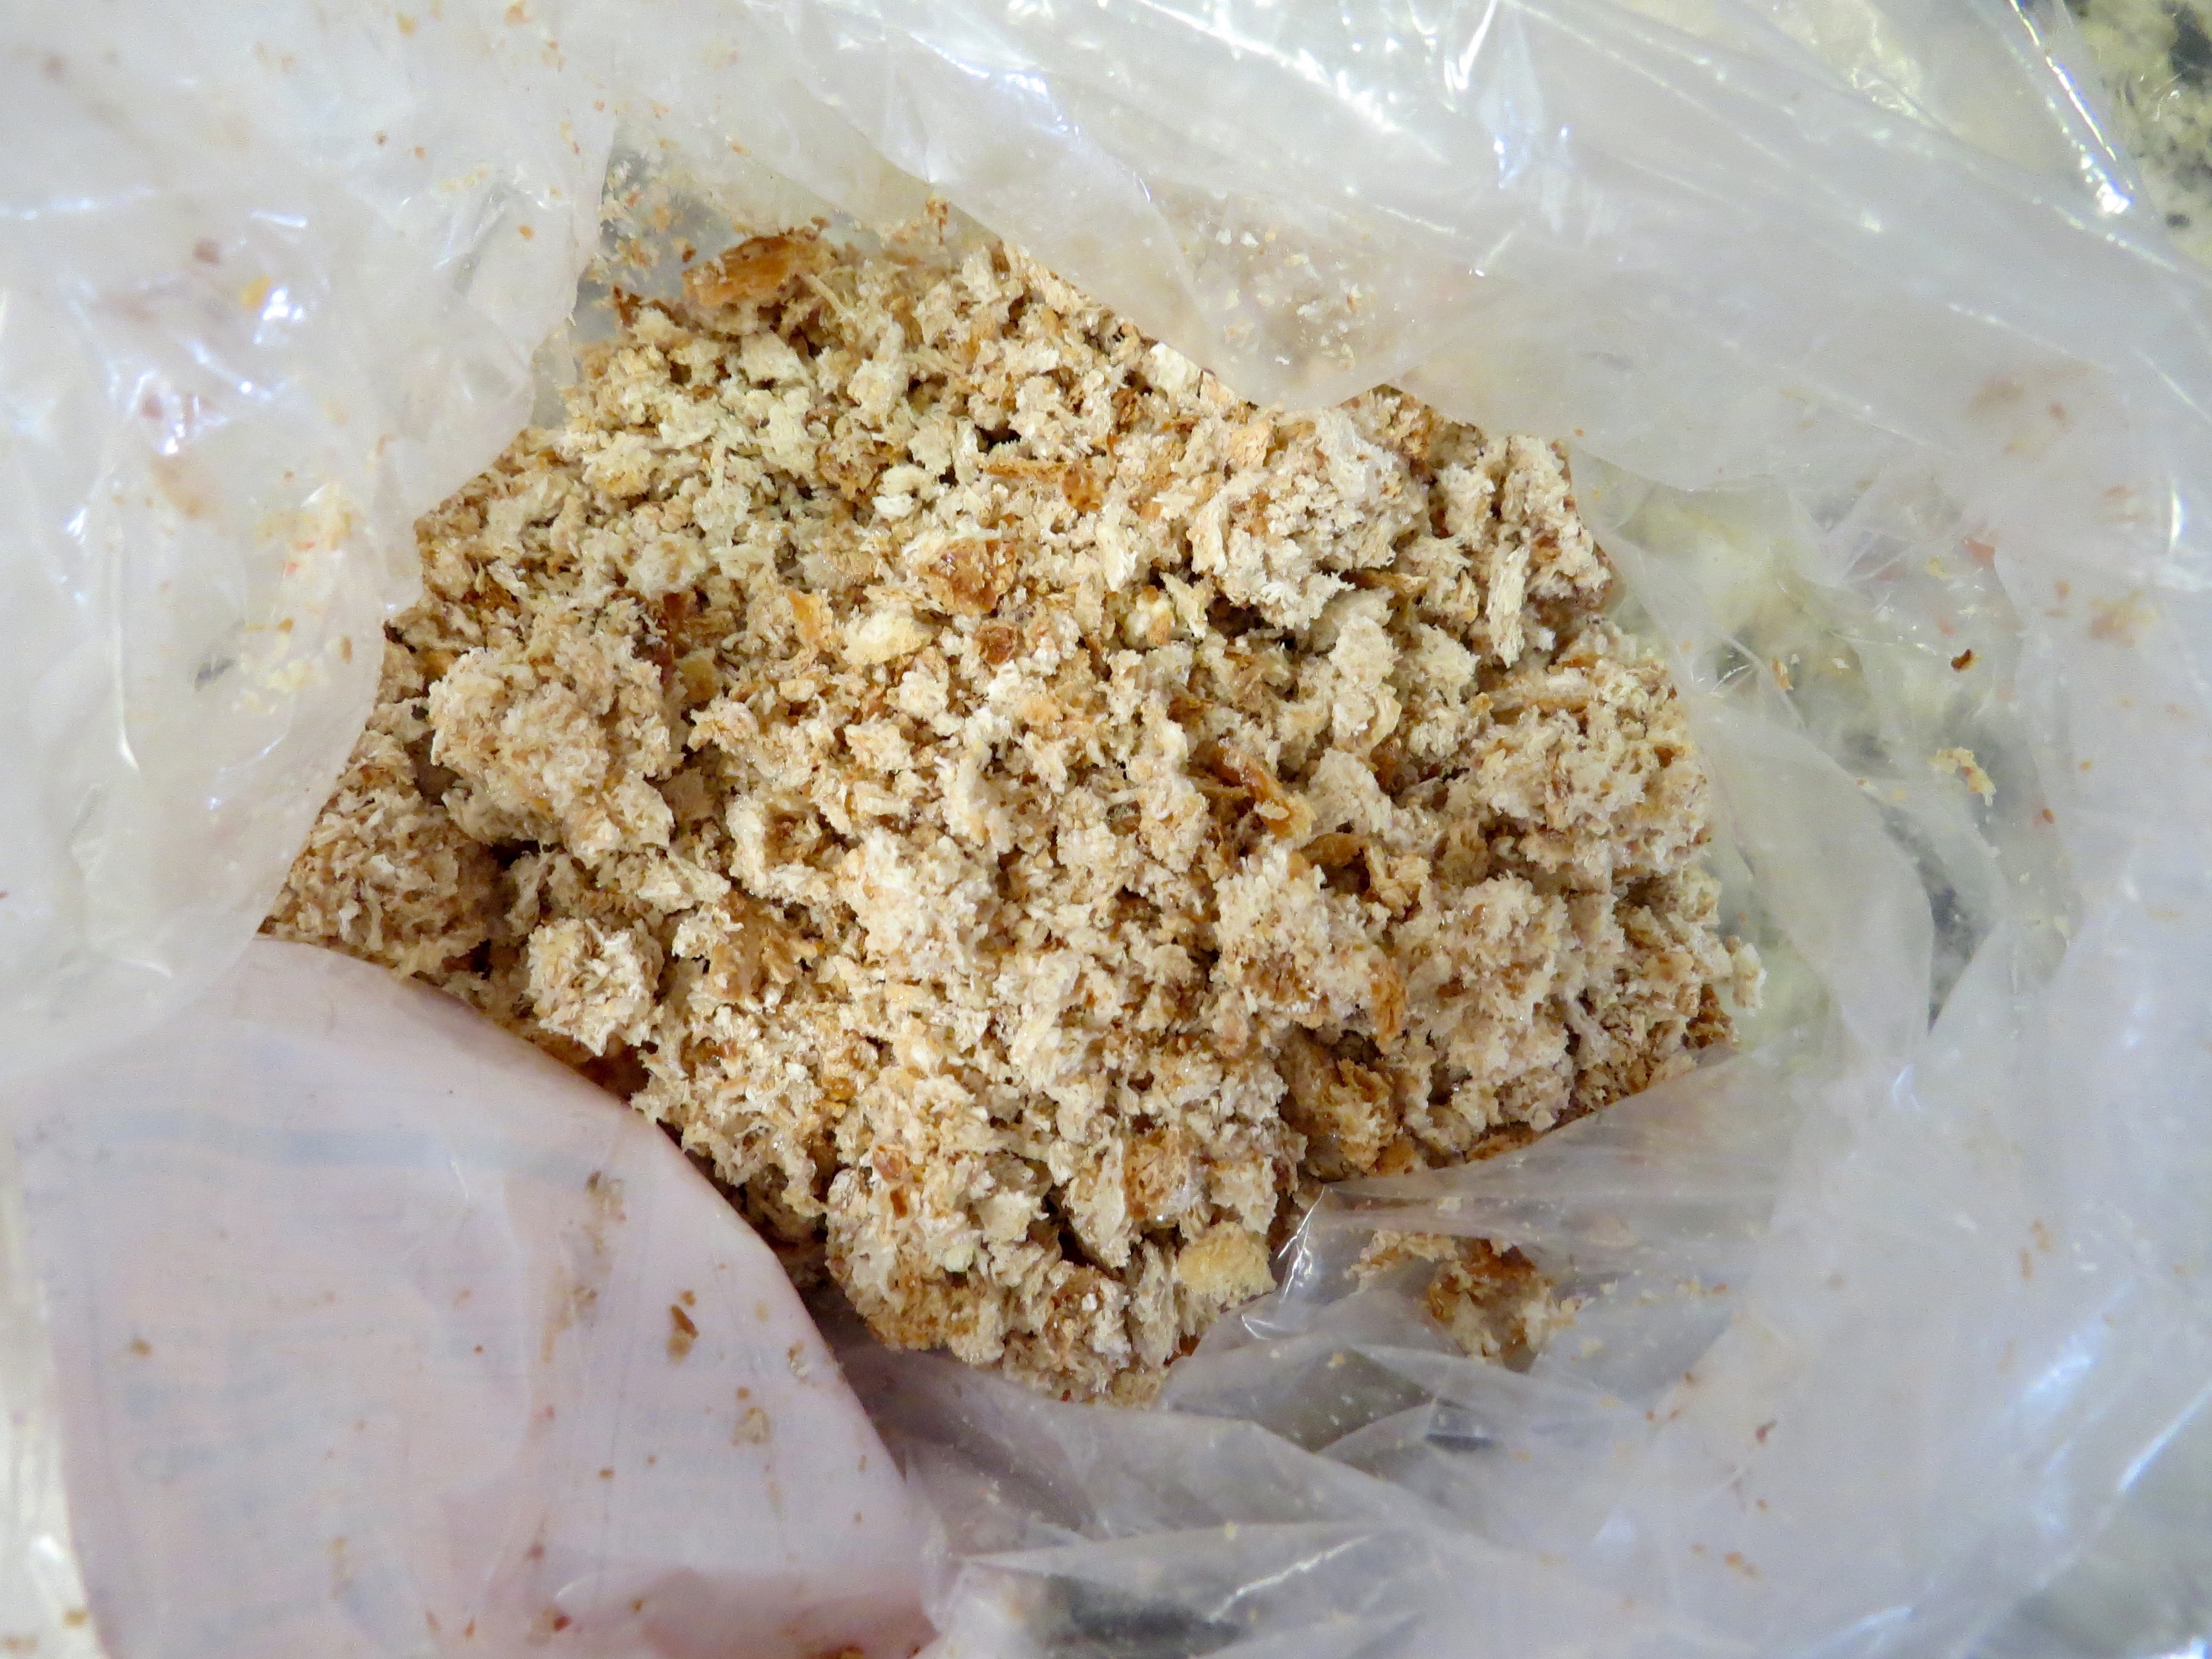
Homemade bread crumbs are probably the easiest way to use up old bread. Cubed, seasoned and tossed with a drizzle of quality olive oil and toasted in a slow oven begets some pretty crunchy, tasty croutons. Old bread shredded to crumbs in a food processor are easily stored in the freezer and used as bread crumbs for coating meat or as an additive to the best meatloaf recipe ever.
1/2 cup water to thin sauce if necessary (I never thin)
Preheat oven to 350 degrees F. Mix together beef, bread crumbs, onion, egg, salt, pepper and 8 ounces of tomato sauce. Form into loaf and place in loaf pan. Stir together remaining tomato sauce, vinegar, sugar, mustard, Worcestershire sauce and pour this sauce over the meatloaf. Bake for 1 1/2 hours. Baste frequently.
Home-made Bread Crumbs
Panzanella Salad is another wonderful way to combine toasted stale bread croutons into a salad of fresh spring lettuce, heirloom tomatoes, fresh mozzarella and purple onion making for a very tasty meal.
I think my favorite way to use up stale bread is making my favorite dessert…bread pudding! Not too many years ago, my BFF Kathleen and I went to NOLA for a few days. One of my most favorite cities in the United States, we of course enjoyed many wonderful culinary masterpieces in various restaurants throughout the Quarter. And at the end of each meal we indulged in one of many sumptuous deserts offered and at each place I was on a quest…to discover the restaurant that created the BEST bread pudding I had ever tasted. Bread pudding should be a melt in your mouth savory smooth filling bathed in a sauce that enhances the bread filling and makes it a sensual experience. I have already recycled some of my bread into a savory chocolate bread pudding that wasn’t half bad.
Sour Dough Blueberry Muffins
And this morning I cranked out some sourdough blueberry muffins to use a portion of my starter so I could feed it again. The recipe came from the King Arthur website and the muffins were tasty if not a little unconventional. The stone ground corn meal ingredient gave them a slight crunchy crumb and they weren’t super sweet which was a plus for me. My only wish was that I wanted them to be bigger in size. It seems that one thing leads to another…my muffin pan is standard size and if I want bigger, I either need to purchase a larger muffin tin or devise a way to make parchment paper cones that will house a larger amount of batter.
This baking journey is turning into a wonderful learning adventure! Happy Baking!!!
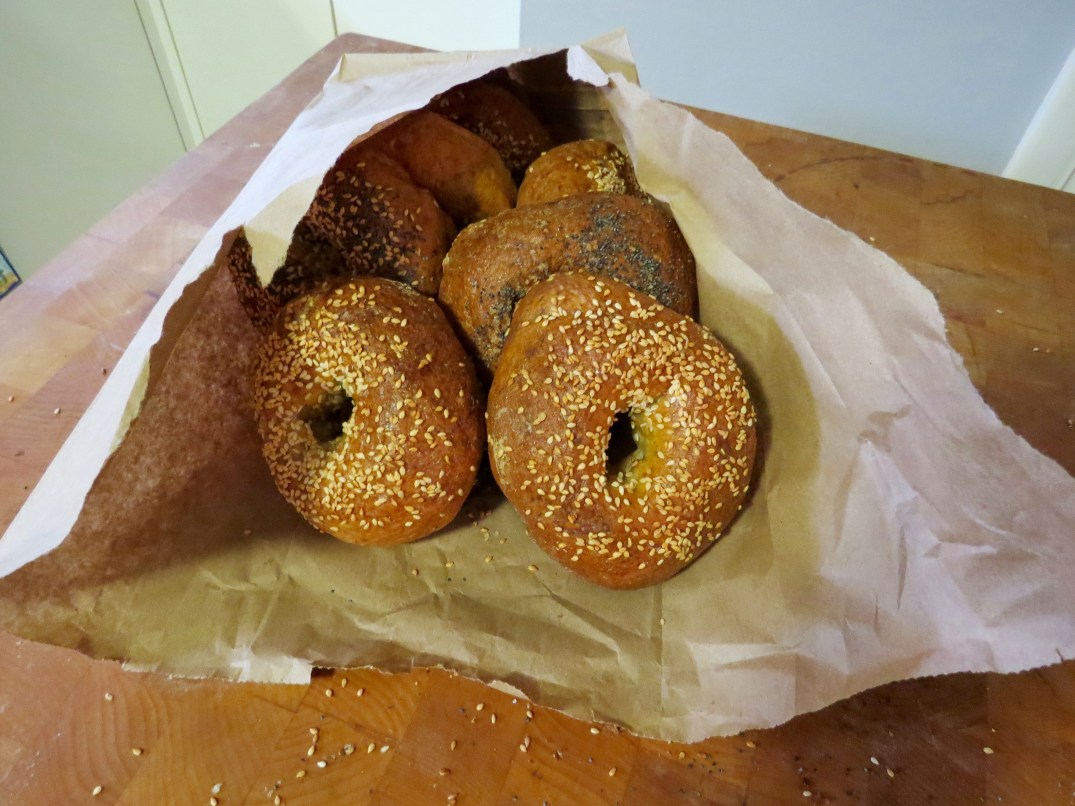
Bagel success! Yesterday evening I switched gears and picked up Julia Child’s Cookbook and began mixing up her bagel recipe. Because it was late, I followed her instructions about refrigerating it overnight and finishing the baking this morning. I was hopeful because if a Julia Child recipe isn’t successful then there is no hope for any cook anywhere!
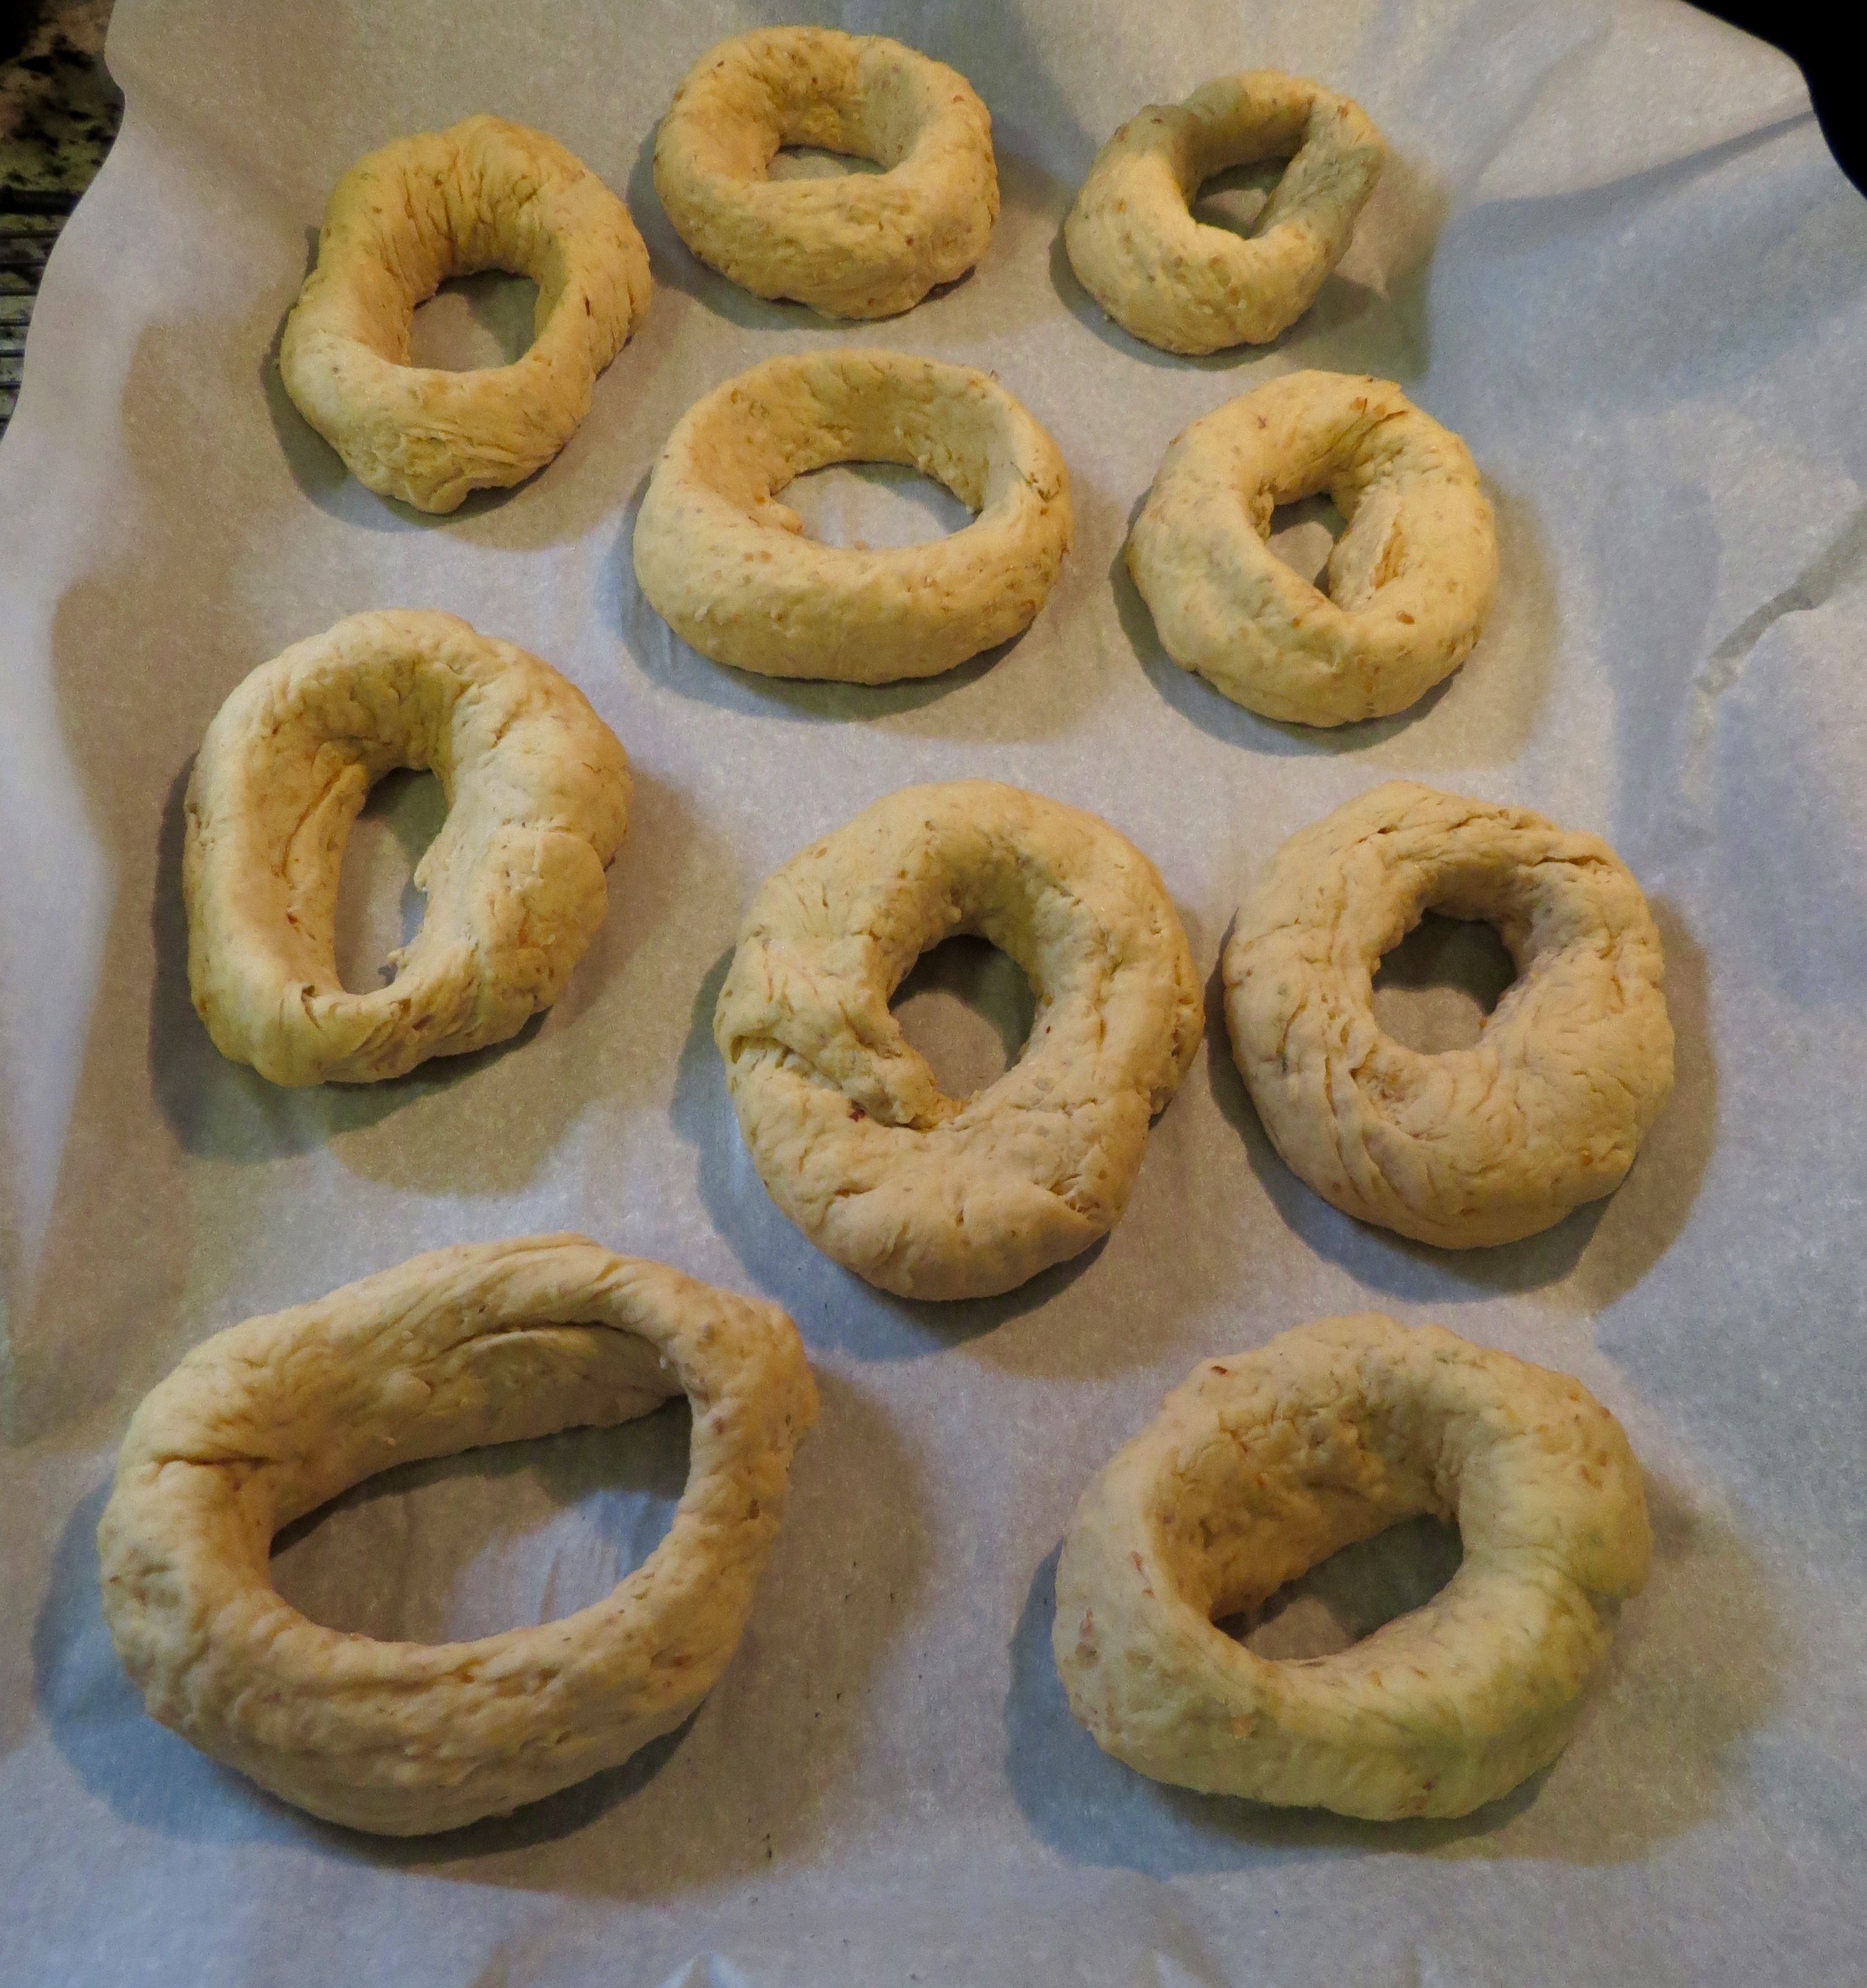
This morning I punched the dough down, cut it in half and each half into five pieces. I actually weighed each piece on my scale so they were close to the same size, approximately 5.2 ounces in weight. I meticulously followed her directions and pulled each ball from back to front to form a gathered area on one side of the ball. Then I placed the gathered area down on my board and mashed my thumb through the center to the other side where I introduced my index finger from my other hand and proceeded to twirl the dough around until the hole was about 2 inches in diameter. Once all had been formed, I did the hot water bath trick for two minutes on each side where they puffed up beautifully. Once removed, I brushed each one with egg white, applied sesame and poppy seeds and popped them into the oven at 500 degrees on my baking stone that promptly cracked. I tossed about 10 ice cubes into the bottom of my oven so they would get steamed a little and then I reduced the heat to 450 degrees and baked for 25 minutes, left them sitting on the stone with oven turned off for another 5 minutes and then finally five more minutes with the oven door open before moving them to a cooling rack. I still had one batch left to do so I inverted my cookie sheet and used that to bake the remaining five bagels.
Ready to bakeI’ll miss my trusty baking stone 😦
They were beautiful!!! Even with all my troubles with a broken baking stone, the crust was crisp, crunchy and the crumb within was soft, chewy and moist. My idea of a perfect bagel. And big bonus, they were delicious.
Julia’s recipe is a keeper for sure and will be my go-to bagel recipe in the future.
Multigrain Bagel with poppy seeds, flax seeds and kosher salt toppings
Win some and lose some. Last night I took “Boris” out of the fridge and combined the sponge for making sour dough bread this morning. The best use for these sour dough bread loaves would be as bludgeons for a murdering spree! I don’t have a clue what happened…starter (AKA Boris) losing his super power??? I just don’t know what went wrong so all 3 loaves hit the trash bin. What all was right? Nothing… weighed a ton, hard as a rock, still doughy crumb after an hour in the oven, less sour taste than previous loaf. I could not find one redeeming quality. I hate to fail!!!! Not in my wheelhouse so I’ll try again another day.
Epic Failure. Only good for use as a baseball bat!!!
Moving on to what I thought might be successful, I turned my attention to making bagels for the first time in my life. The recipe I followed came from my Bread Alone book by Daniel Leader and Judith Blahnik. I followed the recipe exactly except for one small deviation (maybe this is where I always shoot myself in the foot!!) and added a scant cup of my multigrain cereal mix to make them have a multigrain quality. Everything seemed to go well but the end result was neither super great nor abysmal. They had a great taste, nice crumb and looked OK but my personal preference is for the bagel to be a little larger than what these were. I didn’t get the oven spring I wanted (cereal multigrain mix???), but the overall result wasn’t horrible. On the plus side, smaller equals fewer calories, they weren’t dense and chewy as most bagels are and they had a chewy texture and pleasant taste.
Perfect crumb, moist and chewyDivided into 2.5 ounce balls of doughShaped and awaiting water bathOut of water bath and sprinkled with toppings….poppy seeds, flax seeds, kosher salt and one with rehydrated shallots
Each baking adventure is a learning process and I am gaining in knowledge with each failure and success. Most importantly, I am having fun in the process so I will keep….
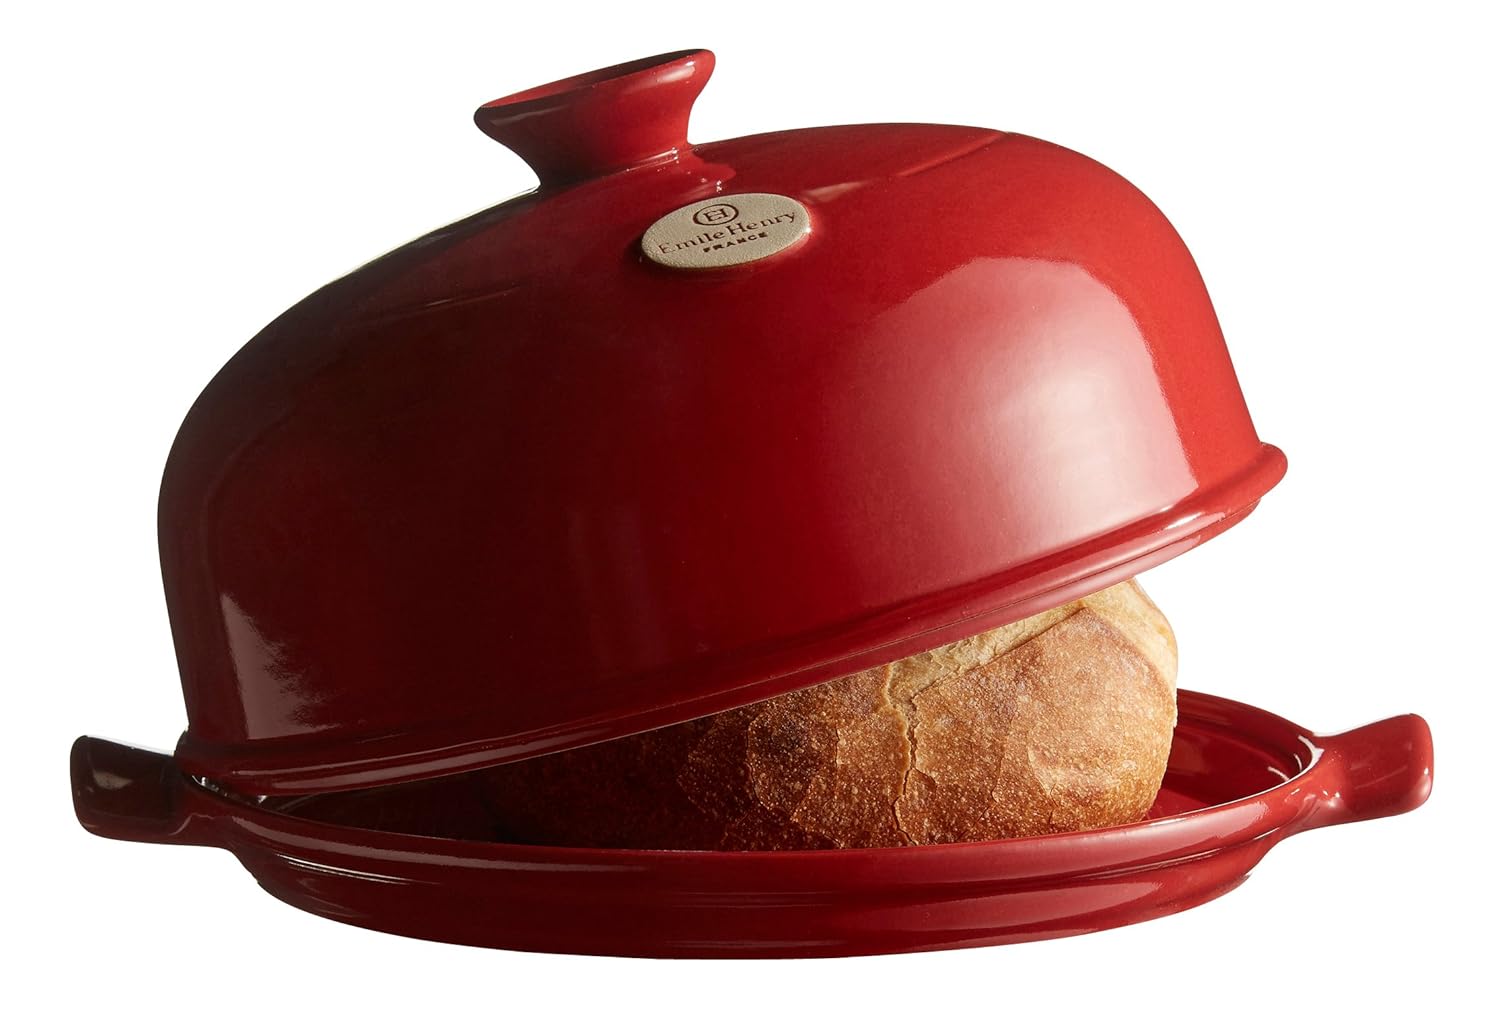
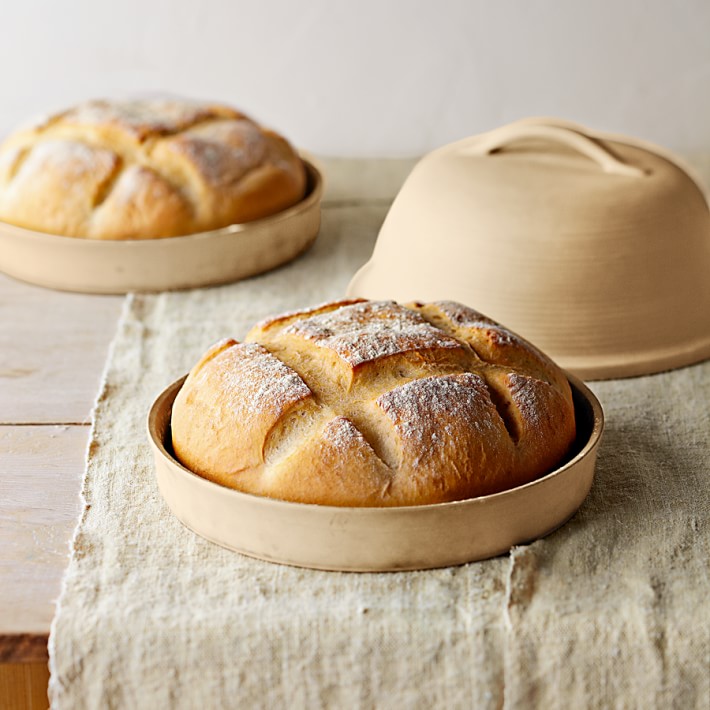
Today after work, I visited the Goodwill Store next to my office in search of a “cloche” bread baker. This particular bread baking item can be quite pricey so in hopes of finding one that had been discarded when its previous owner had lost interest, I hit the aisles. Fortune did not shine on me for there were no cloches or baking stones in this particular store. Not to be defeated, I tried another Goodwill store on my way home but once again no luck. The price for finding your treasure at a cheap cost means many trips to the stores hoping that eventually you’ll be rewarded.
What is a clouche? An ingenious bread baking container with a domed lid that captures the moisture coming off of the dough as the bread begins to bake. This moisture simulates the steam within a commercial oven which produces a crisp, chewy crust. I am salivating for one of these bread baking miracle pots
I find it interesting that deciding to bake my way through a bread book can lead to not only new knowledge but also a desire to reorganize my kitchen into a more “cook friendly” one. I have vacillated many times in my life between wanting the clean, uncluttered counter look in my kitchen to desiring kitchen utensils surrounding me in a wabi sabi manner. I always wind up back in a wabi sabi mode because I love the look, the feel of having familiar items surrounding me…an easy reach to my favorite wooden spoon, my salt-cellar I dragged all the way home from Italy, the Boos butcher block that has become a familiar friend, different shapes and sizes of glass containers filled with a variety of flours and grains and of course the mixing bowls…including one that belonged to my Mother and I can almost feel her hands performing the same mixing rituals. A memory is attached to all of my kitchen utensils and equipment and with their help, I have produced many, many successful meals as well as some monstrous mistakes. It is a learning process and learning new things, experiencing new textures, flavors, sensual, visual or auditory sensations is exuberating. Isn’t life grand!!!
I love pizza!! I’ve lived in Austin for twelve years and I spent many years searching for a pizza to rival my favorite Houston pie purveyor… Star Pizza. Star turned out a whole wheat Vegetarian Starburst pizza second to none. Gooey cheese, caramelized onions, broccoli, mushrooms, zucchini squash, green peppers and a light splash of a tangy tomato sauce. I craved this pizza on a regular basis and went into pizza withdrawal when I moved to Austin. My BFF Kathleen regularly takes pity on me and brings me one when she comes to visit.
No worries though…I kept trying different Austin pizzerias and discovered Via 313 Pizza. They offer Chicago style crunchy yet chewy pizza crust in several combinations that satisfy my cravings. My favorite at this pizza parlour is “The Cadillac”…Gorgonzola cheese, fig preserves, Prosciutto di Parma, Parmesan drizzled with a Balsamic Glaze. A Melt in your mouth-watering experience! My second favorite at Via 313 is “The Rocket”…Hot Soppresatta, spicy arugula and shaved Parmesan. These pies aren’t cheap but so worth it since these guys use the highest quality ingredients which probably helps them create such gastronomical delights.
Through the years I have experimented with making my own pizza. My pizza stone gets quite a workout with pizzas, cookies, and bread. I usually use a whole wheat crust purchased from HEB or Trader Joe’s. My “go to” favorite at home pizza consists of cheese, cheese and more cheese (who doesn’t like bread and cheese!), caramelized onions, Medjool date pieces, cooked bacon bits, cherry tomatoes, roasted peppers, Parmesan Reggiano cheese and a splash of Con Olio pungent, peppery olive oil followed by a drizzle of Fig Balsamic Vinegar and a dash of coarse kosher salt. But I’ve decided that the time has come for me to master my own pizza dough since I have a definite preference for my toppings.
Prepped pizza toppings
Yesterday I tackled making pizza dough for the first time. Just plain old pizza dough. Using my Kitchen Aide, mixing the dough was easy and it doubled in size in about two hours. While it was rising, I prepped the toppings for my pizza. Next I gathered the dough into a ball and pressed it out on my pizza peel that was lightly dusted with flour. I was even able to pick the dough up and stretch it by moving my fists around and around like you see in the movies. With practice I might be able to send the dough flying. It stretched quickly to the size I wanted and after topping it, baked in a 475 degree oven for about 20 minutes.
My Pizza
For a first effort at making my own pizza dough, it wasn’t half bad. Was it perfect? Hardly and I will keep trying to find the one that satisfies my palette. I know I prefer a whole wheat crust so will try that next and perhaps bake in a square or rectangular pan to try to get that crisp buttery crust that Via 313 has made famous. Too bad I can’t take a lesson from their expert pizza makers.
Rye Sourdough Taster – Looking sourdoughish to me!
So I spent yesterday in my kitchen “playing” with the two starter mixes. The one from the Tassajara Bread Book wasn’t looking too healthy but had a slight sour smell none the less. I decided that it might be starving so I fed it some flour and spring water and instantly it began to revive. So much for just stirring it daily for five days…definitely did NOT work!
The rye starter from the Bread Alone book was very healthy but I have been feeding it daily. In the end, I decided to leave the Tassajara starter to grow and mature for a few more days and I would use the Bread Alone rye starter to make some bread. The directions in the Bread Alone book left something to be desired and I found myself trying to “wing” it. I watched you-tube videos (thank goodness for the internet!) and plodded forward into a day of folding and proofing for about 8 hours. Finally I decided it was ready to form into loaves. Frankly I was tired of the whole process and was ready to go to bed. I divided the dough in half and divided one of those halves into two. I made a round loaf that I cooked in my Le Crueset dutch oven and the other two pieces I formed into baguettes. After a final rise, I baked them and the end result wasn’t all that great.
Rye Starter ready for the fridge
When I bent the baguette it had a nice crackle. The crust was crisp and successful thanks to the pan of water beneath the loaves that delivered moisture in the form of steam as they baked. The inside crumb was chewy, moist and decidedly rye. The round loaf in my Dutch oven was not a thing of beauty. I had difficulty transferring the risen loaf into a blasting hot preheated dutch oven, burning myself a couple of times in the process. Bottom line…I think the starter needs to mature more and baking bread successfully and without injury, demands the right equipment. I fed a couple of tablespoons of this starter and placed the jar in the fridge until next weekend when I may try again. Now I am asking myself why I am bothering with the rye starter since I am not a great fan of rye bread.
Two Multigrain Dakota bread loaves and three Rye Sour Dough
On the plus side of this very long day in the baking kitchen, I cranked out more Multi-grain Dakota bread. My original loaf of this bread met my culinary needs but the loaf was quite large. I decided to divide the dough into two loaves this time but wasn’t too happy with the end result. The boule was great, just smaller, but the second loaf I placed into the willow basket (Banneton) and when I turned it out onto the stone, it spread while baking resulting in less rise. Bread still tastes great but just not as aesthetically pleasing as the round loaf.
Multigrain Dakota Bread that spread too much. Still tastes great!
As I write, I have another loaf of Dakota bread rising and almost ready for the oven. Did I say how easy this loaf is to make and that it is yummy!!! Onward to pizza crust for my dinner tonight and lunch tomorrow when I head back to work.


 A popular scene in many movies is someone feeding the pigeons from a park bench. Seeds, bread crumbs being fed to a flock of birds is a peaceful bucolic scene. There is a man who lives in my condo building who daily makes his way to feed the numerous pigeons that call our little piece of property their home. They flock around him eagerly awaiting the tiny morsels he brings them each day.